| |
|
Description
The Microchip PICDEM.net Demonstration Board, is one of the first development
boards produced by Microchip that featured an Ethernet controller on the board,
particularly the Realtek RTL8019.
The board includes a 40-pin IC socket, a 8-pin socket populated with a 24LC256
I2C Serial EEPROM, a pair of potentiometers, a 16x2 character LCD module,
a RS232 serial interface, a user pushbutton and some LEDs and obviously the
Ethernet controller with a pulse transformer and RJ45 connector.
Earlier versions of the board included a PIC16F877 preloaded with a TCP/IP stack
and demonstration webserver from Iosoft. Later versions included a PIC18F452
preloaded with Microchip's TCP/IP Stack v2.11.
This project will show you how to update the PICDEM.net board to be able to
run a modified version of the latest Microchip TCP/IP stack.
|
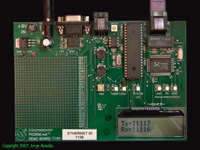
Microchip's PICDEM.net
[Click Image to Enlarge]
|
Design considerations
PICDEM.net modifications
The are not required board layout or circuit changes to the PICDEM.net,
but to be able to run the latest Microchip TCP/IP stack you will need
to replace the microcontroller for a 40-pin PIC18F part.
Microcontroller selection & external memory
As mentioned before, to be able to run the Microchip TCP/IP stack
you will need to replace original microcontroller provided with the board.
The PICDEM.net use to ship with a PIC16F877A and/or a PIC18F452. The Microchip
TCP/IP stack does not support any of the PIC16 family controllers, but
you can still write your own code to interface with the RTL8019 if you wish.
You can squeeze the TCP/IP stack image on the PIC18F452 but a better and
recommended option due it's additional program and RAM memory space and
more advanced peripherals is the PIC18F4620.
I tested this project with several microcontrollers including the PIC18F452,
PIC18F4520, PIC18F4525, and PIC18F4620.
Also to preserve the original memory and add some additional memory
capacity to the HTTP server I replaced the original 24LC256 by a 24FC512,
the latest provides twice the memory capacity and the "FC" series
supports I2C clocks up to 1MHz instead of the standard 400KHz, but you can
also use a 24LC512 or 24LC256.
Microcontroller Clock Frequency
I don't know the actual reason but this board has a very weird crystal
frequency 19.6608MHz, the code will run fine at this frequency but don't
expect it to blast packets at very high speed. Using the udptest module
the highest packet rate I was able to achieve using the original crystal
was 19pps and about 156Kbps.
I didn't try it but if you want to venture, you can replace the existing
crystal by a 10MHz crystal and change the configuration bits for the MCU
to set the HSPLL bit, this way the MCU will be running at 40MHz, just double
check that the new clock rate is consistent with the RTL8019 timings.
Schematics
The PICDEM.net User's Guide includes detailed schematics for the board
on Appendix A. There is a link below pointing to the latest version of
this document from Microchip.
|
Getting the board up and running
Compiling the firmware is not a huge or complicated task, it requires few
software tools available for download from Microchip's
website at no cost, and obviously the TCP/IP stack source code distribution and a
PIC programmer. For this project I used Microchip's
MPLAB ICD2 as a programmer.
With the latest modified version of the
Microchip TCP/IP Stack v3.75, the process is quite simple.
This new version adds the PICDEMNET macro definition that
combined with the device selection for the Microcontroller generates the appropriate
code for this particular project.
The software distribution includes the MPLAB IDE project file
PICDEMNET.mcp, load this project into MPLAB IDE,
select the correct processor (by default the project has selected the PIC18F4620)
and verify that the settings on the config.h and
picdemnet.h files apply to your project or modify them
accordingly (both files are located in the include
subdirectory of the main src directory).
For additional details check the README.TXT file
included in the software distribution.
For a detailed explanation about how to build Microchip's TCP/IP stack
for this or similar projects Click Here.
|
Datasheets for relevant parts used in this project
Useful Links
TCP/IP Stack Source code and useful software tools
Additional Resources
|
|
|
