Description
The Microchip Explorer 16 Board provides a low cost development platform for
the 16-bit line of microcontrollers and DSPs from Microchip.
The board includes four header jumpers arranged in a way that they can accept
a 100-pin plug-in module (PIM) with different PIC24 and dsPIC33 parts, a
25LC256 Serial EEPROM, a 16x2 character LCD module, a RS232 serial interface,
some user pushbutton and LEDs.
For this particular project I decided to go with the Microchip
Ethernet PICtail Plus board featuring the ENC28J60 Ethernet controller.
This project will show you how to run the modified version of the latest
Microchip TCP/IP stack on the Explorer 16 Board.
|
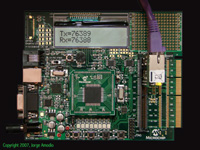
Microchip's Explorer 16
[Click Image to Enlarge]
|
Design considerations
Explorer 16 modifications
Unless you choose to use a different network interface card or Ethernet
controller than the Ethernet PICTail Plus, there are not required
extra connections or circuit changes to the Explorer 16.
Be aware that there are two different versions of the Ethernet PICTail
cards, the best option for this project is the "Plus" version since its
card edge connector matches exactly with the upper portion of the
expansion slot on the Explorer 16, by just inserting the Ethernet
PICTail Plus on the expansion slot all needed signals and power are
connected to the board.
Microcontroller selection & external memory
There are several 100-pin Plug-In Modules (PIM) available from Microchip,
for this project I used a PIM with a dsPIC33FJ256GP710 and a PIM
with a PIC24HJ256G610, both chips running at 40 MIPS.
Both chips have plenty of program memory and RAM for this project.
As mentioned before the board includes a 25LC256 Serial EEPROM that will
be used for storing configuration information and HTTP server documents.
Microcontroller Clock Frequency
For both the dsPIC33FJ256GP710 and PIC24HJ256G610 we'll set the clock
frequency at 80MHz which provides the maximum 40 MIPS.
Schematics
The Explorer 16 User's Guide includes detailed schematics for the board
on Appendix A, and a detailed schematic for the Ethernet PICTail plus is
available on the product page.
There are links below pointing to the latest version of these document from
Microchip.
|
Getting the board up and running
Compiling the firmware is not a huge or complicated task, it requires few
software tools available for download from Microchip's
website at no cost, and obviously the TCP/IP stack source code distribution and a
PIC programmer. For this project I used Microchip's
MPLAB ICD2 as a programmer.
With the latest modified version of the
Microchip TCP/IP Stack v3.75, the process is quite simple.
This new version adds two macro definitions, EXP16_DSPIC33
for the Explorer 16 with the dsPIC33FJ256GP710 PIM and EXP16_PIC24HJ
for the Explorer 16 with the PIC24HJ256G610 PIM.
The software distribution includes also two MPLAB IDE project files
EXP16_DSPIC33.mcp and EXP16_PIC24H.mcp,
load the appropriate project into MPLAB IDE, it project has already the correct
processor selected.
Verify that the settings on the config.h and
exp16_dspic33.h or exp16_pic24h.h
files apply to your project or modify them accordingly (both files are located
in the include subdirectory of the main
src directory).
For additional details check the README.TXT file
included in the software distribution.
For a detailed explanation about how to build Microchip's TCP/IP stack
for this or similar projects Click Here.
|
